
Zero-Shot, One-Shot, and Few-Shot Prompting: What Examples Actually Change
The demo works. The real inputs don't. Same prompt, same model, and suddenly the output is the wrong shape, the wrong label, or confidently on the wrong…

Key topics
The demo works. The real inputs don't. Same prompt, same model, and suddenly the output is the wrong shape, the wrong label, or confidently on the wrong side of a line you thought was obvious. The instinct is to add examples. Sometimes that fixes it. Sometimes it just makes the failure more expensive.
Here is the model I want to replace: examples are a difficulty dial you turn up when the task gets hard. That model is wrong in a way that costs real tokens and real debugging time. Examples are evidence, and different examples carry different kinds of evidence. Zero-shot, one-shot, and few-shot prompting are not three rungs on a ladder. They are three different amounts of evidence aimed at three different failure modes. The decision is not "how hard is this task." It is "what is my task actually missing, and does an example supply it."
This assumes you already treat the prompt as an explicit interface with observable inputs, constraints, and outputs. The question here is narrower: what does the evidence layer inside that interface actually buy you, and when does it not pay for itself?
The Decision Axis: What Is Your Task Actually Missing?
Before comparing the three techniques, name what an example can teach. There are three distinct things, and conflating them is why people add examples that don't help.
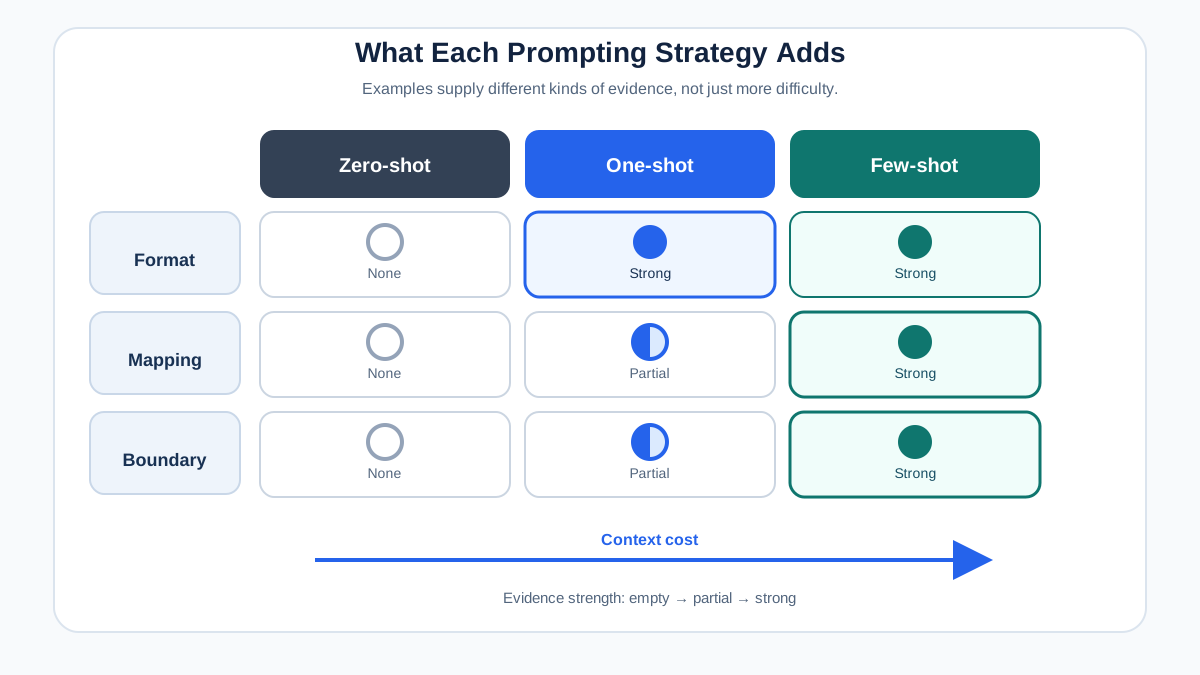
Format evidence is what the output should look like: field names, ordering, casing, verbosity, whether the model explains itself or returns a bare value. Mapping evidence is which input pattern maps to which label or action — the actual input-to-output relationship the model has to learn. Boundary evidence is where the line between categories sits, including the near-misses that make the line hard.
These are not the same problem, and they don't have the same fix. When the model fails, ask which one broke. Is it producing the wrong shape? That's format. Is it producing the right shape with the wrong answer? That's mapping. Is it right on easy cases and wrong on the ambiguous ones? That's boundary.
The cost side of the axis is real too. Every example adds tokens, adds latency, and adds a maintenance surface — an example that was correct last quarter can quietly become wrong as the task evolves. And there is a subtler cost: a bad example teaches the wrong thing, and the model learns it just as eagerly as the right one.
The diagnostic question is not "should I add examples?" It is "which of format, mapping, or boundary is failing?" Each answer points at a different fix, and only some of them are examples.
Knowledge check
Check your understanding
Answer this question before you continue.
What Demonstrations Actually Do to the Model
Before the technique-by-technique comparison, it's worth being precise about the mechanism, because the taxonomy above only makes sense if you know what a demonstration changes.
A demonstration does not update the model's weights. It does not teach the model a rule the way fine-tuning would. What it does is establish a local pattern inside the context window: a correspondence between an input and an output, plus a convention for how outputs are shaped. The model then continues that pattern for the next input. This is in-context learning — the model conditions on the sequence of demonstrations and the test input together, and infers what kind of transformation is being asked for.
A minimal trace makes this concrete. Suppose you're classifying support tickets into billing, bug, or feature_request. Zero-shot, you describe the categories and hand over the ticket. One-shot, you prepend:
Input: "I was charged twice this month."
Output: billing
Now the model has a local pattern: input text, then a bare category label. It will likely produce a bare label for the next ticket too — because the demonstration established both the mapping (this kind of text → billing) and the output convention (bare label, no explanation). Two things changed at once, and that's the point: a single demonstration is rarely teaching only one thing.
Add a second demonstration that sits near a boundary:
Input: "The export button doesn't work on Safari."
Output: bug

Input: "Can you add CSV export to the reports page?"
Output: feature_request
The second pair does something the first couldn't: it shows the model where the line between bug and feature_request sits when the surface vocabulary overlaps. Both mention export. One is broken behavior, one is a missing capability. That contrast is boundary evidence, and it's the kind of thing a single example cannot supply.
What the model is not doing is learning a guaranteed rule. It's inferring a pattern from a handful of points, and that inference is fragile. If your examples happen to share a surface cue — say, every bug example mentions a browser name — the model may latch onto "browser name → bug" instead of the actual distinction. That's correlation mistaken for rule, and it's the failure mode that makes few-shot prompting look better on a benchmark than it is in production. The model didn't learn your category boundary. It learned a shortcut that happened to fit your examples.
Keep that fragility in mind through everything below. Demonstrations are evidence, and evidence can mislead.
Knowledge check
Check your understanding
Answer this question before you continue.
Zero-Shot: What the Model Already Knows, and Where That Runs Out
Zero-shot prompting gives the model the task with no demonstrations. It relies on the task being well-represented in pretraining and the instruction being unambiguous. When both hold, it is the cheapest and most maintainable option you have — nothing to author, nothing to keep current, nothing to drift.
The failure signatures are specific enough to recognize. Output shape drifts: you asked for a category name and got a paragraph. The model refuses or hedges on a task it should handle. Or it answers confidently while ignoring a constraint you stated in plain text.
That last one is worth separating carefully. If the model never had a clear contract, adding examples patches a symptom instead of fixing the interface. I've watched people bolt three demonstrations onto a prompt whose instruction was genuinely ambiguous, and the examples "fixed" it by accident — they happened to disambiguate what the instruction should have said. That's not a win for few-shot. That's a win for writing the contract down.
Zero-shot genuinely wins in a few situations. Tasks with high input diversity, where any fixed example set is a poor match for most inputs. Tasks where examples would be expensive to author or keep current. Tasks where the label set changes often, so a fixed example set goes stale fast.
One honest limit: zero-shot performance is a measurement, not a property of the technique. It varies by model family and version. A zero-shot result on one model tells you almost nothing about another.
One-Shot: The Cheapest Evidence You Can Add
A single example is often disproportionately effective at pinning down the output contract — not as a universal property of one-shot prompting, but as a recurring practical pattern. Field names, ordering, casing, verbosity, whether the model should explain itself: one demonstration resolves most of that ambiguity faster than a paragraph of instructions, because it shows the shape instead of describing it. For generation tasks, it also acts as a weak anchor for style and register.
The trap is that one example is a single sample of the boundary. If it sits far from the decision edge — an easy, obvious case — the model generalizes a line that doesn't match where the real boundary lives. You taught it the shape of the answer and accidentally taught it the wrong edge.
A pattern I reach for: one example that demonstrates the exact output shape, plus an explicit instruction covering everything the example does not. The example handles format; the instruction handles the rest. Don't ask one demonstration to carry mapping and boundary work it can't do.
One example can also be worse than none. If it's unrepresentative, if it introduces a format the instruction contradicts, or if it teaches the model to copy surface details of the example input, you've spent tokens to make the output worse.
Knowledge check
Check your understanding
Answer this question before you continue.
Few-Shot: What More Examples Buy, and What They Do Not
Few-shot prompting adds two or more demonstrations. The useful distinction is that more examples buy two different things, and count alone is not the lever.
The first is boundary evidence: near-misses, ambiguous cases, and the specific distinctions the model keeps collapsing. This is where few-shot earns its cost. If your model is right on easy inputs and wrong on the hard edge, examples that sit on that edge are the fix.
The second is coverage: when the label space or output space is large, a handful of examples spread across categories can outperform many examples clustered in one. Coverage and boundary are different jobs, and a set optimized for one may be useless for the other.
Selection beats volume. On diverse inputs, choosing examples relevant to the current input tends to outperform a fixed set. The published evidence here is directional rather than universal — reported gains vary widely by model family, task, and formatting — but the pattern shows up repeatedly: a few well-selected examples can match or beat many static ones.
There's a subtlety in selection worth naming. Semantic similarity picks examples that look like the current input, which helps when the task is about surface form. But if the hard cases are hard because they sit near a boundary, the most similar examples may all be on the same side of that boundary — and you've just reinforced the wrong edge. Relevance matching and boundary coverage are not the same objective. Sometimes you want the nearest neighbors; sometimes you want the contrastive pair that shows the distinction.
Format and placement are part of the mechanism, not cosmetics. The same examples delivered as structured message turns versus one appended text block can behave differently, and the effect is model-dependent. Some model families respond strongly to message-formatted demonstrations and barely at all to the same content as a string; others show much smaller effects either way. Treat this as something to measure on your stack, not something to assume.
Then there are the negative returns. Redundant examples waste context. Contradictory examples teach noise. A wrong example can be worse than no example at all. More is not a direction.
Knowledge check
Check your understanding
Answer this question before you continue.
A Test Protocol: Does the Example Pay for Itself?
Stop guessing. Run four conditions on the same inputs and read the error breakdown.
1. Build a small labeled set of real inputs. Include the ambiguous and near-miss cases that motivated the question — not just easy examples. Twenty inputs is enough to start.
2. Define the metric before running. Exact-match on a structured field, valid-output rate, or human-scored correctness. Track invalid outputs separately from wrong ones, because examples often fix shape before they fix reasoning.
3. Run four conditions, holding instruction, model, and test set constant:
- Zero-shot with an explicit output contract
- One-shot with a single format example
- Few-shot with a fixed set
- Few-shot with per-input selected examples
The one-shot condition is deliberately format-only. The few-shot conditions change more than one variable at once — count, mapping coverage, and boundary coverage — so treat the comparison as directional, not as a clean isolation of any single factor. If you need to isolate selection from count, run a fifth condition: few-shot with a fixed set of the same size as the selected set.
4. Read the error breakdown, not the aggregate. If invalid outputs drop but accuracy doesn't move, you bought format, not judgment. That's a real result — just not the one you were shopping for.
5. Compute the real cost. Tokens per call, latency, and the maintenance burden of keeping examples correct as the task evolves.
6. Apply the decision rule. Adopt examples only when the measured gain survives the cost and the failure mode you were targeting actually moved.
The table below is a hypothetical readout from one such run, not observed results. It's here to show the shape of the analysis, not to predict your numbers.
condition              valid%   correct%   tokens/call
zero-shot              0.72     0.61       ~400
one-shot (format)      0.94     0.63       ~700
few-shot (fixed, k=3)  0.95     0.71       ~1100
few-shot (selected)    0.96     0.79       ~1150
Read it the way it's meant to be read. One-shot bought validity — shape — and almost nothing on correctness. The fixed few-shot set bought some mapping. Selected examples bought the most, at roughly the same token cost as the fixed set. If your only problem was shape, the one-shot row is your answer and the rest is waste.
Failure Modes That Survive More Examples
Adding examples cannot fix every problem. These are the ones that persist no matter how many demonstrations you stack.
Teaching the wrong boundary. Examples that are all easy cases leave the hard edge undefined, and the model interpolates confidently across it. You've given it evidence about everything except the thing you needed.
Correlation mistaken for rule. This is the one that fools benchmarks. If your examples share a surface cue that correlates with the label — every bug mentions a browser, every billing mentions a dollar sign — the model may learn the cue instead of the distinction. It scores well on inputs that share the cue and fails on the ones that don't. The fix is contrastive examples: pairs that share surface features but require different outputs, plus test inputs that deliberately break the cue. If accuracy collapses when you strip the cue, you taught a shortcut, not a rule.
Leakage and copying. The model reproduces details of the example input instead of the pattern, especially when examples share surface features with the test input. This is a real risk when your examples look structurally similar to the inputs you care about.
Contract drift. When examples and instructions disagree, the model tends to follow whichever is more concrete — usually the example. If you update the instruction and forget the example, the example wins.
Context pressure. Examples crowd out the actual input or retrieved evidence. This matters more as the task moves toward dynamic context assembly, where every demonstration is competing for the same limited space as the material the model actually needs.
When the fix is retrieval, a schema-constrained output, or a different model, more examples are the wrong tool. The signal is that your error breakdown doesn't move no matter how you change the demonstrations.
Choosing Between Them: A Short Decision Rule
Start zero-shot with an explicit output contract. Add examples only after you can name the failure mode.
Add one example when the problem is shape or style. Add a small, boundary-focused set when the problem is a mapping the model keeps getting wrong. Prefer selected examples over a large fixed set when inputs are diverse — but check that your selection isn't just reinforcing the same side of the boundary. And re-measure whenever the model version changes, because the effect of examples is model-dependent and not stable across upgrades.
That last point deserves emphasis. A prompt that leaned on demonstrations to carry a task can regress silently when the underlying model changes, because the demonstrations were compensating for something the new model handles differently. Examples are not a permanent fix. They are a measurement with an expiration date.
Pick one failing task this week. Label twenty real inputs, including the hard ones and a few contrastive pairs that break your surface cues. Run the four conditions. Let the error breakdown decide — not the demo, not the intuition, not the number of examples someone else reported working.
And notice what happens when you go one step further: once examples stop being a static block and start being selected at runtime based on the current input, you've stopped doing prompt design and started doing context assembly. That's a different problem with different tools, and it's where the interesting engineering lives.
Knowledge check
Final check
Finish the article by checking the ideas you just learned.
References
Research updated Sep 11, 2026


